Engage your supporters and get them involved to champion your organization for you. Let them know that if they can’t give (money) then maybe they can give time. Or maybe they can do both. Add a Volunteer Signup Page on your website and/or Facebook page.
Log into your GiveSmart Fundraise account to get started.
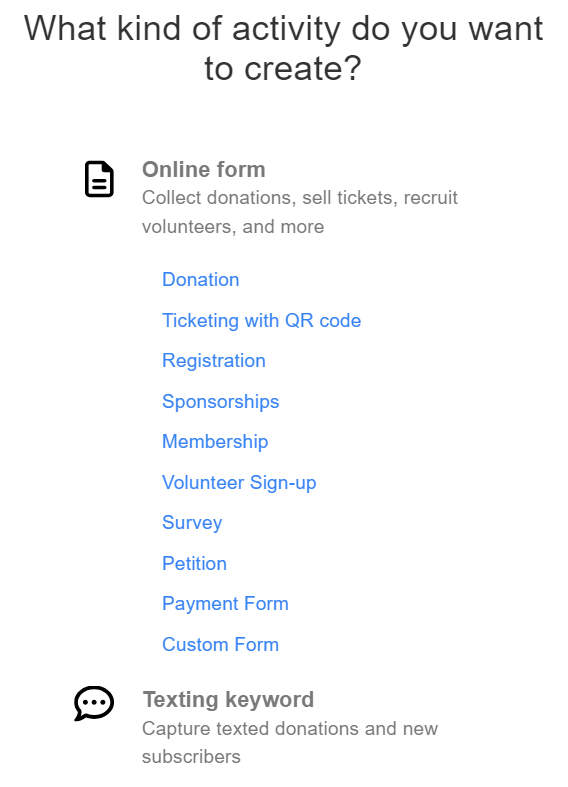
Create a new form, by selecting New Activity. Choose Online Form, and select Volunteer Sign-Up from the dropdown.
If you already have Volunteer Sign Up forms, select Activity Keywords from the left navigation, and select your existing volunteer sign-up form.
Setup your Activity
Follow the normal process for creating a new activity with the Keyword setup page, including the keyword and shortcode you want to use and personalizing your thank you page. For more information on this step, click here.
Setup your Online Form (Volunteer Form)
Select what information you collect and how the general volunteer experience will feel. As you edit the volunteer form, you will see a mobile preview of the changes you make to the right of the accordion dropdown.
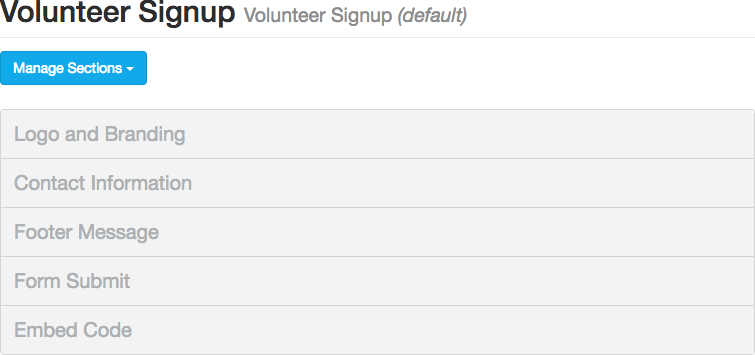
Logo and Branding
Upload a Logo - Here you will upload your organization's logo for the header of your donation form. We recommend that your logo is 600x200px in dimensions for best formatting. You may choose to either show or hide the logo all together using the dropdown to the right.
Background Image - This is where you will upload the image you wish to be displayed in the background of your mobile donation form. We recommend that the image be 1920x1080px for best formatting. You also have three choices in which to change the alignment of the background image:
Center - Takes one image and stretches it to fit the size of the screen.
- Tile - Tiles the image multiple times both vertically and horizontally.
- Tile Horizontally - Tiles the image only horizontally.
Form Alignment - If the focal point of your background image is covered by the form when it is in the center, you can move the form itself to the Left, Centered or Right.
Button Color - The color of the submit button at the bottom of your form. It can be entered either as a hexadecimal code or by clicking on the color square and picking the color of your choice using the wheel.
Background Color - The color of the background of your donation form if you choose not to upload a background image.
Contact Information
Section Heading - This is where you can change the wording of the section header that is displayed above the corresponding section on your form.
Contact Information Fields - Here you can independently hide or show certain personal information fields. As a best practice, we recommend hiding as many fields as possible to shorten the donation process and increase completed forms. It is highly recommended to both leave the Mobile Number and Email as well as make them required.
Footer Message
Custom Message is a great place to add any text or organization info you may want to include from a mission statement to a terms of service. You may choose to either show or hide the custom message all together using the switch to the right.
Form Submit
Section Heading - This is where you can change the wording of the section header that is displayed above the corresponding section on your donation form. If you leave it blank, the Submit button will not be separated from the rest of the form.
Button Text - This is where you change the text on the final submit button. You could change it to "Volunteer" or anything as long as it is under 14 characters.
Enable Re-Captcha - Provides a box on the form requiring the volunteer to prove that "I am not a robot" by clicking the box.
Confirm before submitting - If enabled, when a volunteer clicks the Submit button at the bottom of the form, a popup will come up asking them to confirm their submission.
Manage Sections and Add Custom Fields to Collect Extra Information
When designing your Volunteer Signup form, you may desire to collect extra information that isn't one of the default contact fields included on all your forms. In this situation, you can create any amount of Custom Fields & Sections to collect the necessary information. Click here to to learn more on to how to create these custom fields and use them effectively.