When you aren't interested in selling tickets, but you still want an accurate count of people coming to your event, you can create a Registration or RSVP activity. A Registration activity can be very simple, with single entries on a form, to more complex, with just head counts, added names, or even individual tickets.

Create a Registration Activity
To create a Registration activity, you need to have a Campaign already created. If you do not have a Campaign or want to add this activity to a new one, click on New Campaign to create one and follow the process of creating a campaign, as outlined here.
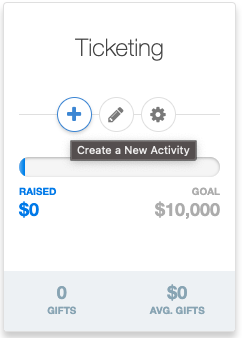
Then create a new activity from the New Activity button on the dashboard on the right or hover your mouse over the Campaign Tile and click on the Plus icon.
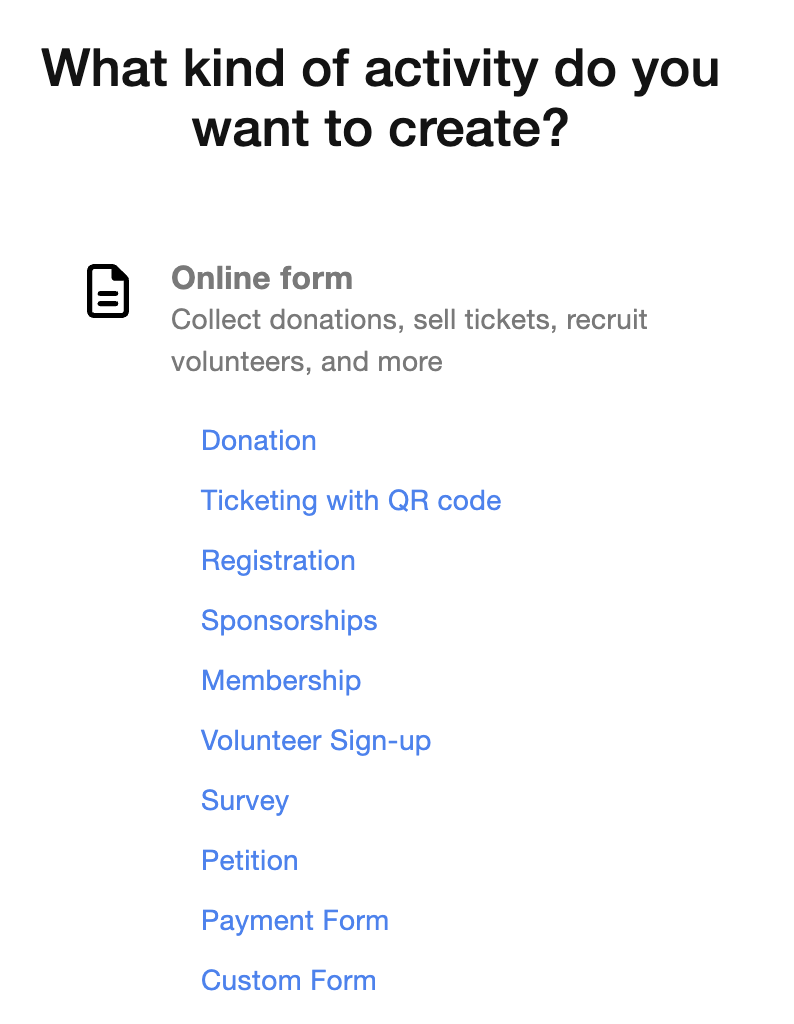
In the pop-up, open the Online Form section and select Registration.
Set Up Your Keyword
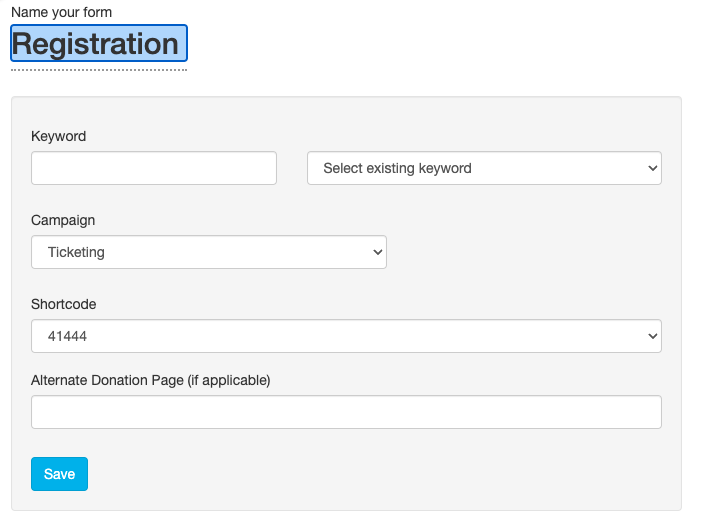
- Either type in a new Keyword, or select an existing one to reset and start from scratch.
- Select a Campaign.
- If you create your activity from the Campaign Tile or within the campaign, it automatically selects the campaign for you.
- Choose what Shortcode you would like to use: 41444 or 91999.
- The shortcode of your keyword is the phone number that the donor will text your keyword to. We give you two options to choose from. Since all GiveSmart Fundraise customers share the same two shortcodes, keyword possibilities can be limited. This allows there to be two of the same keyword to exist, just on separate shortcodes.
- Click Save to create your activity and start personalizing it.
Detailed Set Up Your Keyword Info
Initial Set Up / Preparation
The Online Form is where all potential RSVPs will be directed to. This is where you will select what information you collect and how the general experience will feel. As you edit the form, you will see a mobile preview of the changes you make to the right of the editable sections. You can also preview the desktop and tablet views as well.
The Reservation only has a few initial sections to design to collect the basic information from your supporters. One of the special elements of the Registration activity is that it can be either a non-payment or a payment type of activity, meaning you can add the option to collect donations with your registrations if you desire.
Select the type of Registration you would like to create using the drop-down above the sections. By default, a Registration form is designed as Non Payment form.
| Non-Payment Registration Form | Payment Registration Form |
.png) | .png) |
Non-Payment Registration Setup
Logo and Branding
Change the look of your form with a logo specific to this activity. You can add a background image or color and move the placement of the form on the webpage. You can change the overall color scheme of the form by changing the Button Color by entering a hexadecimal color code, or clicking the color square to use the circle and square to set the color.
Detailed Logo and Branding Info
Contact Information
Collect the information about your supporters, such as their name, mobile number, email address, and physical address. We highly recommend that you select one or more methods of communication as a required item so you have at least one way to reach out to them later, so you can remind them about your event and more.
Detailed Contact Information Info
Footer Message
The Footer Message Section is a text box to add any last item before the donor submits their donation. It is not often used, which is why it is hidden by default. Remember to switch it to Show if you are using the Footer Message section.
Form Submit
The Form Submit section is the last section to personalize on your form that is visible on the form itself. The main function of the Form Submit section is to show the total donation and the SUBMIT button. Change the wording of the button to make it more personal.
Receipts and Notifications
The Receipts and Notifications section of your form configuration allows you to control the automated communication with your constituents. You can choose to use both texting (SMS) and/or Email. Both forms of notification are enabled by default.
Detailed Receipts and Notifications Info
Embed Code
Use the code in the Embed Code section to embed the form on a secure webpage on your site.
Payment Registration Setup
The Payment Registration Setup uses the same settings above for the Non-Payment version, but also includes the different sections for payment processing. Remember that the primary purpose of this activity is to collect numbers for your event, so the payment features should be additions and not as prominent as the payment features, so you will likely want to suppress some of the payment options.
Also the Payment version is essentially the same thing as a Text to Donate activity, so if you have created a donation page, you are already familiar with these sections.
Suggested Amounts
The Suggested Amounts section gives you three donation buttons and an Other button to provide your supporters a choice of amounts to donate.
This will leave you with a box to manually add a donation, so your supporters can donate as well as register for your event. You will likely want to set the Default Donation Amount to 0.
Detailed Suggested Amounts Info
Matching Donations
If you are signed up to use Amply and the Matching Donations option, you will have this section available. If it is not set up, then you will not even see it.
If you feel this may be too much for a Registration form, you can turn off Matching Donations by clicking the Show/Hide switch for Match Donation.
Detailed Matching Donations Info
Recurring Donations
Recurring Donations are likely to not be used with Registrations, so turn off the section by clicking the Enable/Disable switch.
Otherwise, if it doesn't confuse the message of the form, you can include Recurring Donation options.
Detailed Recurring Donations Info
Payment Information
The Payment Information gives you options for the payment transaction. If you have PayPal connected to your account, then you can choose a default payment method. You can choose to give your sponsor the option to cover the payment processing fee with their donation.
Detailed Payment Information Info
Promotional Codes
You may have some sort of promotional discount to offer your supporters when they buy tickets or purchase some kind of good or services.
Since this is an added donation to a registration form, you will likely not use Promotional Codes.
Detailed Promotional Codes Info
Personalize Your Confirmation Page
The Confirmation Page thanks your registrants and provides different calls to action for them. There are only two sections in the Confirmation Page:
- Content
- This is where you can thank your sponsors by name, let them know their payment has been billed and provide text, images and/or videos.
- Actions
- Here, you can add buttons to direct your sponsors to other pages, such as a site to upload a logo or include calendar link for them, etc.
Detailed Confirmation Page Info
Adding Registration Options
Now that you've set the basics for your Registration form, it is time to make personalize this into a more versatile page.
There are generally two main methods of creating Registrains pages, but there's no reason you can't come up with your own style.
The different styles we see used:
- Items/Ticketing Activity: Use Item types to select levels (generally the prettiest of the choices), or use the Ticketing activity and call it Registraions, if there are tickets to be tracked for an event.
- RSVP Section: Add an RSVP Section, to get a more general count of your registrants.
Registration Using Item Form Element
This design of a Registration form used the Item type of Form Element. If you are familiar with creating Ticketing activities, this will be very similar. Otherwise, simply create a Ticketing Activity, Rename it "Registration" and set the price of the tickets to $0.
Detailed Registration Using Item Form Element
Registration Using an RSVP Section
The manual creation method adds a pre-designed RSVP section to allow you to collect a headcount and names of those wishing to attend. While it is not as granular as a Ticketing Activity, it may be all you need with a shorter form than using Item Elements.
Detailed Registration Using an RSVP Section
Reporting and Stewardship
Whichever method you choose for your Registration form, you will need to make sure you are in communication with your registrants, before, during and after your event. You will need to run reports to view the collected information from your form so that you can continue the relationship with the registrants and provide reminders about your event and more.