Your Ticketing Activity starts with a well-crafted form to sell your tickets. This article will guide you through the process.
First, you will want to make sure your Event Details are set. The Event Details will automatically be added to your initial Ticketing form. For more information on setting up the Event Details, click here.
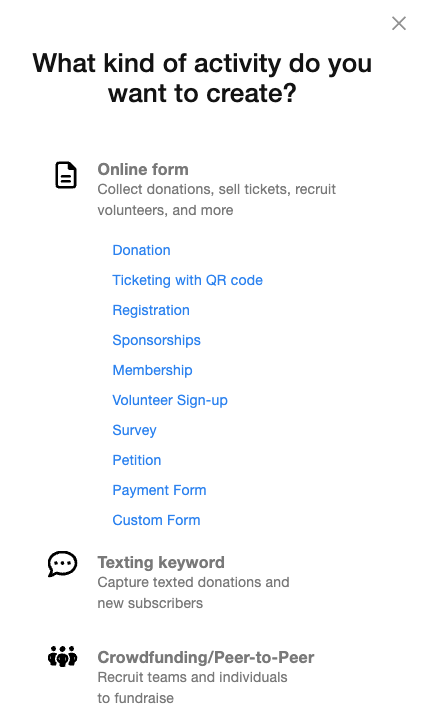
Now you will need to create the Ticketing Activity.
Click New Activity.
Under Online Form, select Ticketing with QR code.
In the Setup Activity Keyword section, make sure to name your Ticketing activity something that will be easily identifiable for your reporting later. For more information about the options in the Setup screen, click here.
Your Ticketing Activity will have the same features as any payment form, such as a Text to Donate activity, with the following adjustments specific to Ticketing:
- Logo and Branding
- Design the look and feel of your form with your desired images and colors. For more information, click here.
- Suggested Amounts
- By default, the Suggested Amounts section is hidden. This will hide the donation buttons, so the selling of your tickets can be prominent on your form. It will still provide the option for your supporters to include an additional contribution when they purchase their tickets.
- Recurring Donations
- Hidden by default, mainly to avoid confusion on a ticketing form.
- Contact Information
- On the Ticketing Activity, the First Name, Last Name, and Email are set to required items. These will allow you to provide your supporter with tickets that will be emailed to them with their name on the tickets. This will also allow for easier check-in, by allowing you to search for a guest by name.
- Consider making Mobile Number a required field so your supporter can receive a text with a link to their tickets as well as the email.
- Payment Information
- The Payment Section Visibility starts checked, allowing you to support both paid and free tickets in the same form.
- Footer Message
- Form Submit
- The Button Text defaults to BUY TICKETS
- The Email Receipt is set to include the ticket details. The supporter will receive two emails: Their receipt and a separate email with their tickets.
- Embed Code

There are two additional sections for the Ticketing Activity: Event Details and Tickets.
Event Details
If you have filled out your Event Details for your Campaign, then you may not need to do anything with the Event Details section. It will pull that info to create a header for your Ticketing form automatically.
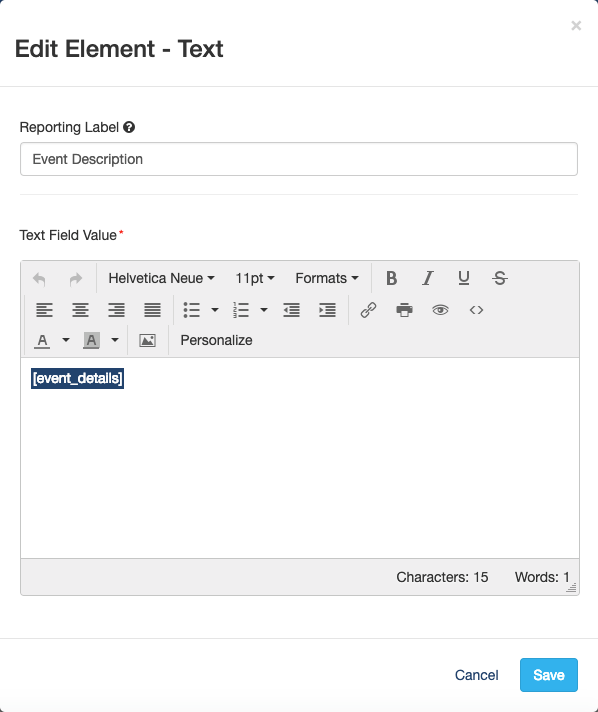
If you prefer to make your own header or add to it, you can edit it by clicking on the edit button (the square with the pencil icon) in the Event Details > Event Description section.
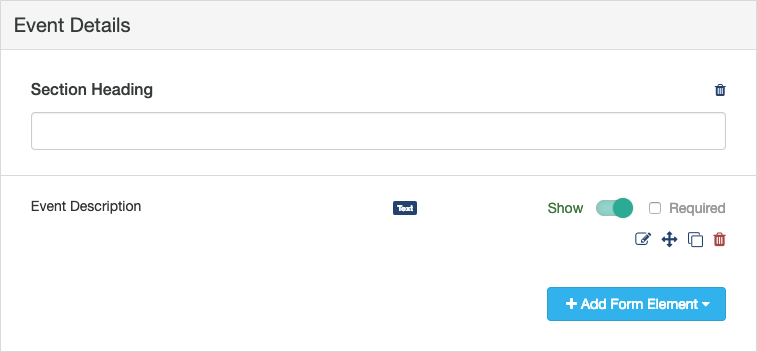
Tickets
The Tickets section is where you can add and edit the tickets for your event. There are several items to this section that you can personalize.

Limit Event Capacity
Your venue only has room for so many people. You can set the Event Capacity with the Limit Event Capacity option.
- Turn the switch from Hide to Show to turn it on.
- Click the Edit icon to set the limit.
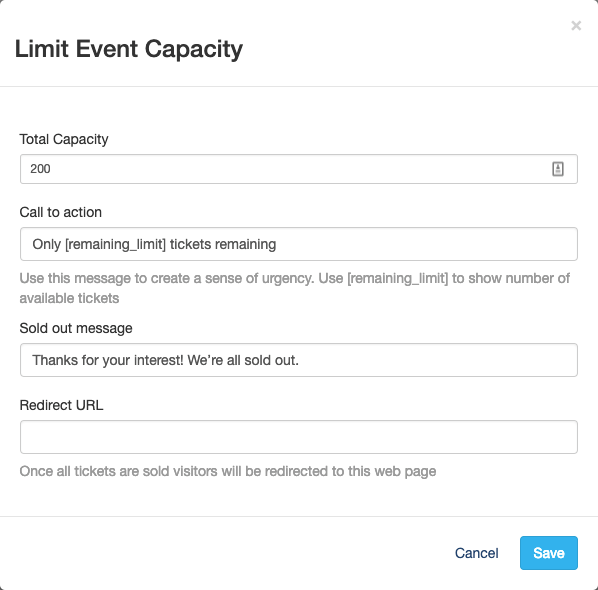
- Total Capacity: Set the total number of tickets you can sell in the Total Capacity field. Note, this controls the total Event/Venue tickets. You can't set a limit on a type of ticket with this field.
- Note: When someone attempts to purchase tickets, the +/- buttons will only allow them to purchase up to the total tickets as dictated by the Total Capacity field. For example, if there only three tickets left, the + button will stop adding tickets after you hit that third one.
- Call to action: Adding text here can alert your supporters to the number of remaining tickets available to inform and instill a sense of urgency to purchase before they are all gone. You can use the variable [remaining_limit] to show the actual number of tickets that are left to purchase.
- Sold out message: You can let your supporters know that they cannot purchase any more tickets on this form with this message.
- Redirect URL: Instead of a sold out message, you can redirect your supporters to some other page, such as a way to watch a video of the event, a donation page, etc.
- Save: Make sure to click Save to put your changes into effect.
Collect Guest Info
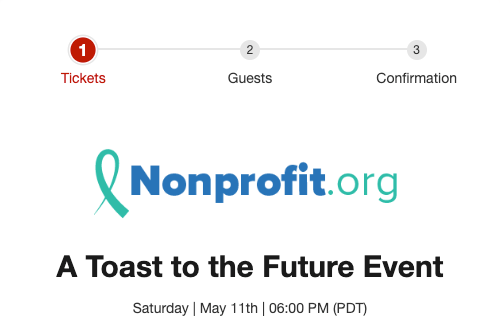
By enabling the switch for Collect Guest Info, you allow for the purchaser to enter the names, phone numbers and emails of the additional guests they are purchasing tickets for. With this enabled the top of your Ticketing Activity will show what step you are on: Tickets, Guests, or Confirmation. To see more on how this process works for your supporters, click here.
Ticket Elements
The Ticketing Activity starts with two Ticket elements already. If you will only have one type of ticket, you can delete one using the Trashcan icon by one of the ticket types and then edit the other.
If you have more than two Ticket types, you can use the Add Form Element > Ticket to add those additional Ticket types.

Click on the Edit icon to adjust the options on your ticket.

- Display Label: Like any other Form Element, this is what will appear on the form for supporters to see. For more on Form Elements, click here.
- Reporting Label: Like any other Form Element, this is what you can choose when you run reports. For more on Form Elements, click here. Make sure, if you change the Display Label, that your Reporting Label reflects what you want.
- Price: Set the price of each ticket
- Set to Free: If you click the link to Set to Free, the ticket price on this edit screen will show FREE so you can easily see that this is, indeed, the free ticket.
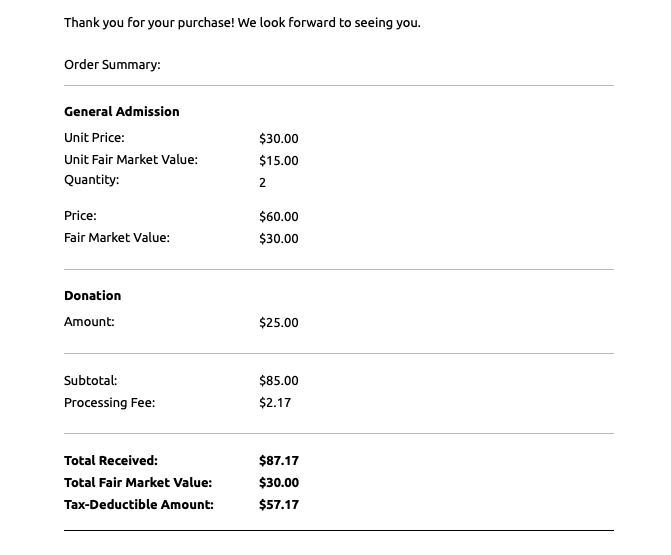
- Fair Market Value (FMV): Set the fair market value for each ticket. The Fair Market Value is the amount that someone would pay for each ticket in a fair market (i.e., outside of the context of supporting your organization). The difference between FMV and the ticket price equals the Tax-Deductible Amount. All three values are displayed on the receipt, however only the price is displayed on the ticketing form.
- Description: If you would like to include more details about what your supporter gets with this level of ticket, you can put those details into the description field.
- Thumbnail: If you want to identify tickets by different images, you can include small images that will appear on the form next to the ticket type.
- Limit Ticket Capacity: If you only can or wish to sell a certain number of a type of ticket, you can switch on the Limit Ticket Capacity.
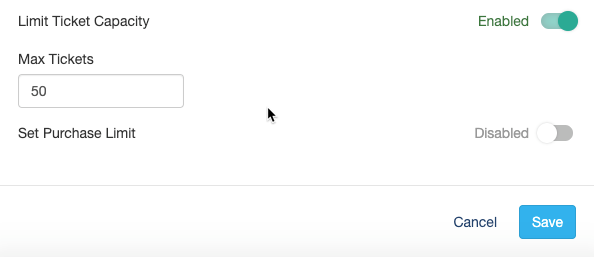
- Max Tickets: When you enable Limit Ticket Capacity from the switch, it will provide you a box to enter the number of tickets of this type you want to sell in total.
- Set Purchase Limit: The purchase limit here is to determine how many tickets you can purchase in one transaction. This is separate from the Event Capacity Limit and Limit Ticket Capacity above. If you set the limit here, any time someone comes to the form, they can only purchase that many tickets, where the Event Capacity Limit is for your entire venue.
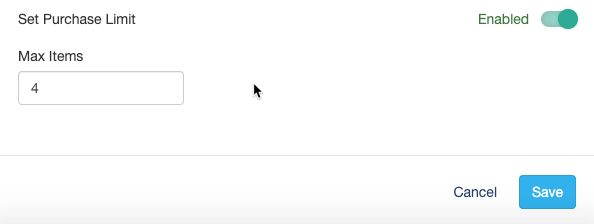
- Max Items: When you enable Set Purchase Limit from the switch, it will provide you a box to enter the number you want to limit the ticket purchase by.
- Save: Make sure you click Save to accept all your changes.
Now you should have a well-designed and personalized Ticketing form ready for your supporters to purchase their tickets to your event.
Purchase Experience
NOTE: Emails and texts for ticketing activities are not editable.
When your supporters purchase tickets, they will receive two emails. If they include their mobile number, they will also receive two texts. The first one will be their receipt, and the second will be their tickets:
| Purchase Email | Ticket Email |
 | 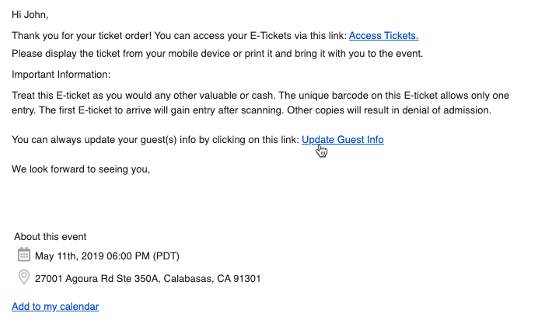 |
| Texts | Tickets in PDF Attachment |
 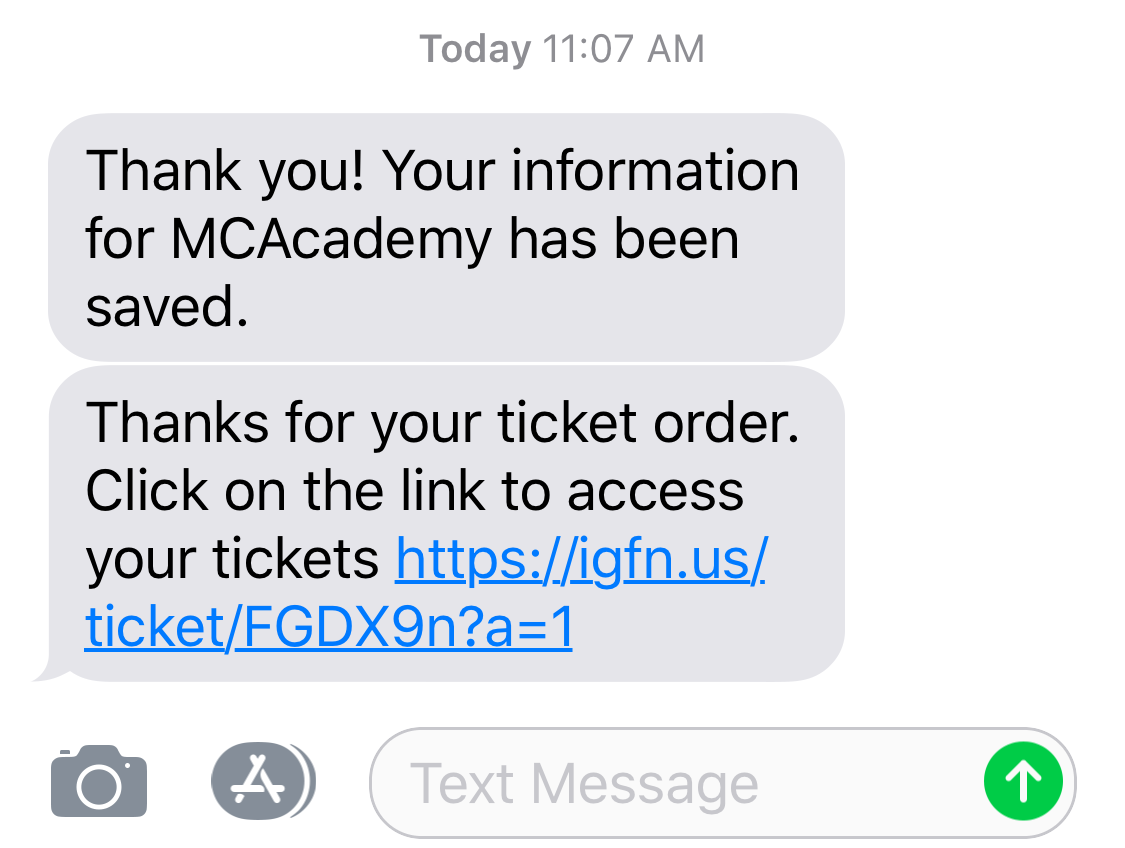 | 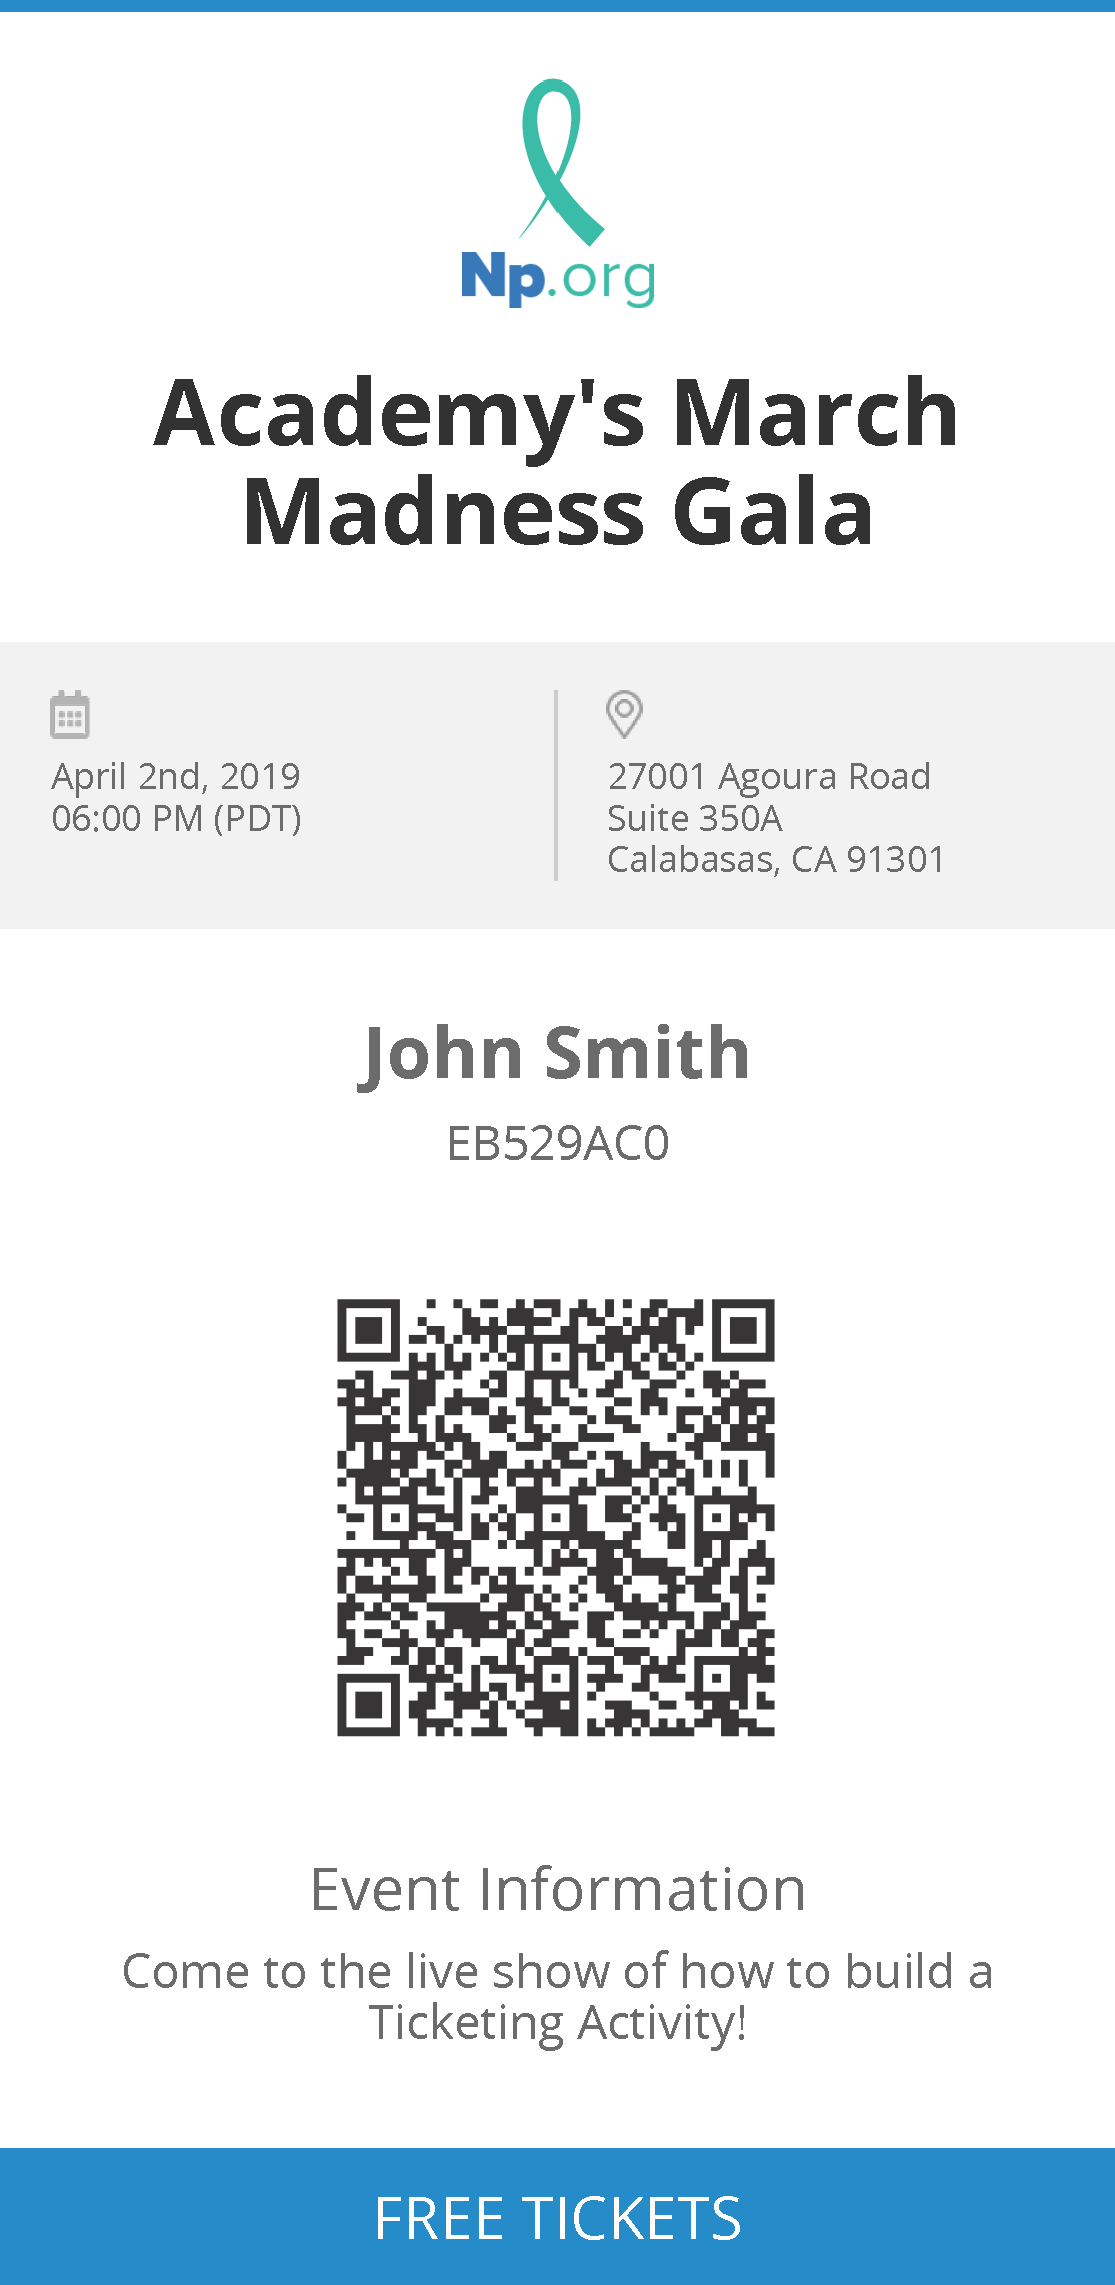 |
Next Steps
Next, you will want to review the Check-in process and the ways you can Manage Guests.